Prior versions of XMD’s Plate Export command did little more than placing the plate and hole geometry in a new, unsaved KeyCreator Part, leaving the designer with a lot of tedious work to get it ready to be sent out. Recognizing this as a prime area for automation, XMD now lets you configure your shop-specific naming convention, preferred file formats, output directory, and more.
Getting Started
Launch the XMD Config program (found in the Windows Start menu). Open the config file you wish to edit, and under the Moldbase tab on the left, select Miscellaneous. You should see a new button on the right that says “Launch the Plate Export Configuration Utility”, pictured below:
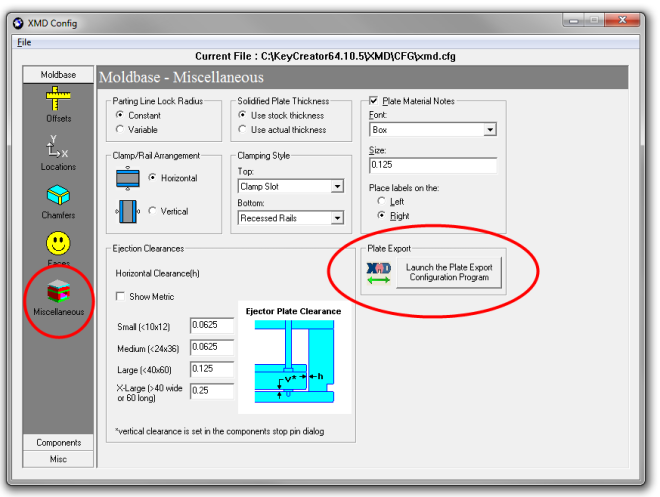
The Plate Export Configuration Utility
At first glance, this dialog looks very similar to the new Plate Export dialog that is brought up in XMD. The main difference, however, is that you are not exporting anything! Instead, this dialog is used to set up default settings for XMD to use in the Plate Export dialog.
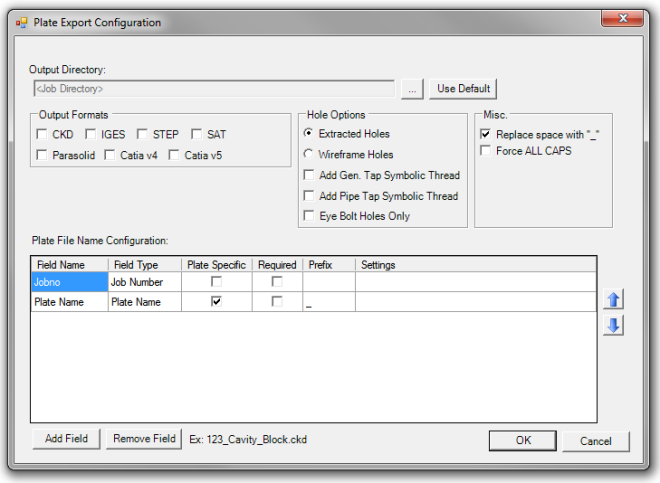
The options in the uppermost portion of the dialog are pretty self-explanatory. What you check is what you will get the next time you perform a plate export in XMD using this configuration file.
The table at the bottom is used to define your shop specific naming convention. If your shop isn’t picky about file names, you can simply use the default naming convention we give you, and you can probably skip the rest of this article.
Configuring Your File Name Convention
The file names that XMD generates for each plate are made up from a series of fields. These fields are listed, in order, in the Plate File Name Configuration Table.
In order to assist in visualizing what a file name would look like, a preview is given underneath the table. Notice in the above picture, that “123_Cavity_Block.ckd” is given as a preview based on the fields that are defined. This example text is very useful in getting your format defined correctly.
Managing the fields is pretty straightforward. To add new fields to your template, simply click the Add button on the bottom left. To remove fields, click the Remove button. To edit existing fields, double-click the field you would like to edit.
Field Order
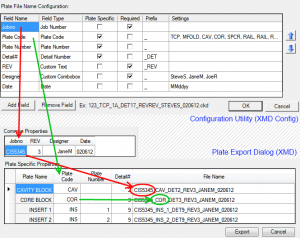
When a plate is exported, the file name is generated by reading the fields from top to bottom. Therefore it is very important to get the fields defined in the proper order.
Pictured to the right is a sample configuration that has multiple fields defined. You can see that the first field defined in the Configuration Utility (upper) is the job number, and it is reflected during the export process in the Plate Export Dialog (lower). The second field is the plate code, and so on.
To re-arrange the field order, simply highlight a row and click the up or down arrows on the right. The highlighted row will be moved up or down accordingly.
Field Table Structure
Field Name – This is the text that is placed at the top of the field’s column in the Export Dialog.
Field Type – There are multiple types of fields available, such as Date, Material, Custom Text, etc. These are explained in detail below.
Plate Specific – Whether this field is displayed separately for each plate in the Plate Specific table, or once in the Common table.
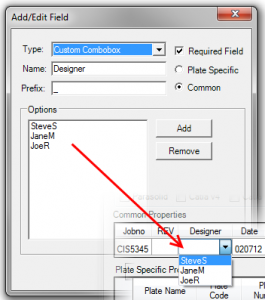
Required – If checked, XMD will not allow the export process to proceed until the field has been set. In the pictured example, the “Designer” field has been marked required so that the designer won’t forget to attach his or her name to the export.
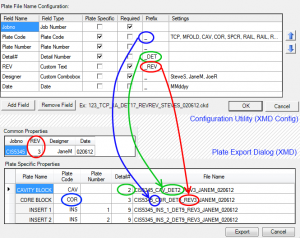
Prefix – Each field can have a prefix set which will appear in front of the value. Prefixes should be used to separate the various fields. You will typically want every field (except the first) to have either an underscore or a dash as the prefix. You can also use prefixes to be more descriptive about what the following field represents (as illustrated in the picture to the right).
Settings – If the field contains additional settings besides the above, they are displayed here. You can see in the example that for the Designer field, SteveS, JaneM, and JoeR have been listed as the designers that may be selected from.
Plate Specific Field Types
During the export procedure, the following predefined field types will appear in the lower “Plate Specific Properties” table. Because XMD understands them, they will be automatically populated with the corresponding values. The following plate specific field types are available:
Plate Name – This will use the plate’s name as-is, including the plate number.
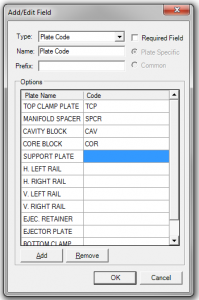
Plate Code – This field is used to map plate names to user-defined plate codes. It consists of two columns and as many rows as you need (pictured on the left). To add or remove a row, use the Add and Remove buttons at the bottom.
The column on the left represents the plate names that you want to match, and is populated initially with the standard plate names XMD uses. The column on the right represents what the plate name on the left will be replaced with.
Matching is done based on what the plate name starts with, and is not case sensitive. The pictured example will match a plate called “Manifold” with the code “SPCR”, but will not match a plate called “Cavity Manifold” because it starts with “Cavity”, not “Manifold”.
In the event that a plate name does not match up with a code, the plate name (minus the number portion, if any) will be used. Therefore, you need only define those plates for which the standard name is not sufficient.
Plate Number – This field type will try to identify a number code at the end of a plate name. Number codes often take the form 1, 1A, or A, and are proceeded with a space, dash, or other delimiter.
This field is very useful when a plate code field is used, so that when multiple plates match up with the same plate code, this field can be used to differentiate.
Plate Material – The configured plate material.
Plate Detail Number – The assigned detail number in the BOM.
Common Field Types
The predefined common field types will appear in the upper “Common Properties” table of the Export dialog, and will be automatically populated by XMD. The following common field types are available:
Job Number – The job number, as it appears in title block.
Date – The date at the time of export. Multiple formats are available to choose from.
Custom Field Types
Custom fields are completely user-defined, and will not be populated by XMD during the export process. You must be careful to define them as either plate specific, or common. The following custom field types are available:
Custom Text – This field type can be used to tell the Export program to include a generic text field. A prime candidate for this field type would be the revision level.
Custom Combobox – This field type is similar to the above, but allows you to predefine the possible values (pictured to the right). At the time of export, these values will be displayed in a combobox that the designer can then choose from. Note that it is also possible for the designer to manually type in a new value if needed.
Fixed Text – This field type is somewhat unique in that it does not visibly appear in either table of the Export Dialog. It will simply appear in every file name that is generated, in the order that is has been defined in. It can be used, for example, to start every file name with your companies initials.
We’re Here to Help!
As always, if you’re having any trouble getting things set up, please let us know! We’d be glad to help.